-
Do you provide free designs?
Yes, we do!
We licensed over 50.000 designs for you to use in your shop to support your business.
To use the designs when creating a product, simply click on Add Product and then on Designs on the left hand side of the creator page.
You can also have a look at our design library in the Customizer of our sample shop.
-
How do I upload my designs?
Follow these steps to upload and mange your designs and make them available for your products:
- In your Spreadconnect App, go to All Your Products on the left-hand side.
- Click on Add Product on the right-hand side upper corner.
- Select which integration you want to add that product to (please note: one product can only ever be published to one integration).
- In the Designer, click on Upload.
- You can either click on Upload an image, or drag & drop the file from your computer.
-
Make sure your design meets our print file requirements. If not, an error message will appear, and the design will not be available for use until the issue is resolved.
Check out more information here: What are the print file requirements?
Managing Your Uploaded Designs
- Uploaded designs will be stored in the upload section of the design tool.
-
Designs can be deleted from the upload library.
-
Deleting a design does not affect products already featuring that design. These products will remain available with the associated design intact.
-
Currently, there is no option for filtering your uploaded products. We are actively working to implement this feature.
-
What are the print file requirements?
Here, you will find the different print file requirements for all of our printing methods.
To learn more about our printing methods: What are Spreadconnect's printing techniques?
Requirements for Pixel Designs
- PNG, JPG, BMP, or GIF file format.
- Maximum file size 10 MB.
- Image resolution at least 200 dpi for apparel.
- Image resolution at least 400 dpi for non-apparel.
- Maximum size 4000 x 4000 pixels.
- Minimum size 1000 x 1000 pixels.
- Design is isolated.
- No color transitions with transparencies.
Requirements for Vector Designs
- We support SVG, AI, and CDR file formats.
- Your design must not exceed 15 x 15 inches. We recommend 11 x 11 inches as the ideal size.
- Lines and other parts of the design must have a diameter of at least 0.06 inches.
- Maximum 3 colors: we can print up to three colors with vector files as plot print(flex, flock, special flex).
- Please create each color in your design as a separate layer.
- All objects and text to be printed must be converted into paths.
- Make sure that all curves are completely closed and do not overlap each other.
- No colour gradients.
Please note: if the vector file is printed as a plot print (flex, flock, and special flex printing), an extra $2.50 / 2,50€ will be added to the product price when they are selected. This is a one-time charge per product, not per design or print area.
Requirements for Poster Designs
Posters can only be printed if the following requirements are met:
- Portrait (2:3 / 3:4), landscape (3:2 / 4:3) or square (1:1) format.
- Resolution: 200 dpi minimum.
- Minimum size: Portrait: 4724 × 7087 px, Landscape: 7087 × 4724 px,
Square: 4724 × 4724 px. - File formats: JPG, PNG.
- Size limit: 100 MB.
- Color profile: RGB or CMYK.
- White design elements will not show up on the white poster backgrounds, you cannot print white designs.
- Additional 2 mm margin on all sides (to avoid clipping).
Requirements for Sticker Designs
- Sticker Size: 10 cm × 10 cm (4" × 4"), 29.21 cm × 7.62 cm (11.5" × 3")
- File Format: PNG
- Supported Files: Pixel and vector formats
- Recommended File Size: 4000 × 4000 px
- Not suitable for white designs.
-
How do pixel designs work and how can you optimize them for printing?
Pixel designs, or raster graphics, are images composed of small units called pixels, arranged in a grid. These designs are widely used for printing on textiles and other materials due to their ability to represent detailed photos, illustrations, and color gradients. To ensure the best results when printing with Spreadconnect, understanding how pixel designs work and how to optimize them is crucial.
What Are Pixel Designs?
Pixel designs are multicolored images made up of individual pixels (picture elements). Each pixel contains specific color information, and together, these pixels form the complete image. Here's what you need to know:
- Best Uses: Suitable for photos, detailed designs, illustrations, and gradients.
- Print Methods Supported: Digital printing, laser transfer, thermal sublimation.
- Resolution: The clarity of the design is determined by its resolution, measured in dpi (dots per inch). Spreadconnect recommends a resolution of 200 dpi means 200 pixels per inch (= 2.54 cm).
How to Optimize Pixel Graphics for Printing?
1. Recommended DPI: 200 dpi for best results. For example:
- A graphic 1000 pixels wide will print as 5 inches wide (at 200 dpi).
- A graphic 2000 pixels wide will print as 10 inches wide.
2. Avoid Loss of Quality: Low-resolution designs (e.g., 800 x 600 pixels) become blurry when enlarged. Upload images with sufficient resolution and pixels.
3. File Size and Format
- Maximum recommended resolution: 4000 x 4000 pixels to stay within the 10 MB file size limit.
- Supported formats: PNG, JPG, GIF, BMP.
How to Remove Backgrounds from Pixel Designs?
When printing, unwanted backgrounds can negatively affect the design. Here’s how to ensure only your motif is printed:
Using Photoshop with Remove Background Tool (Quick Action):
-
- Found in the Properties Panel.
- Uses Adobe's AI (Adobe Sensei) to automatically remove the background with minimal effort.
- Best for straightforward removal needs and saves time.
Using GIMP:
- Rename the background layer to enable editing.
- Ensure the image is in RGB color mode.
- Add a new transparent layer below the original layer.
- Use the fuzzy select tool to delete the background.
- Export the file as PNG.
Additional Considerations for Printing
-
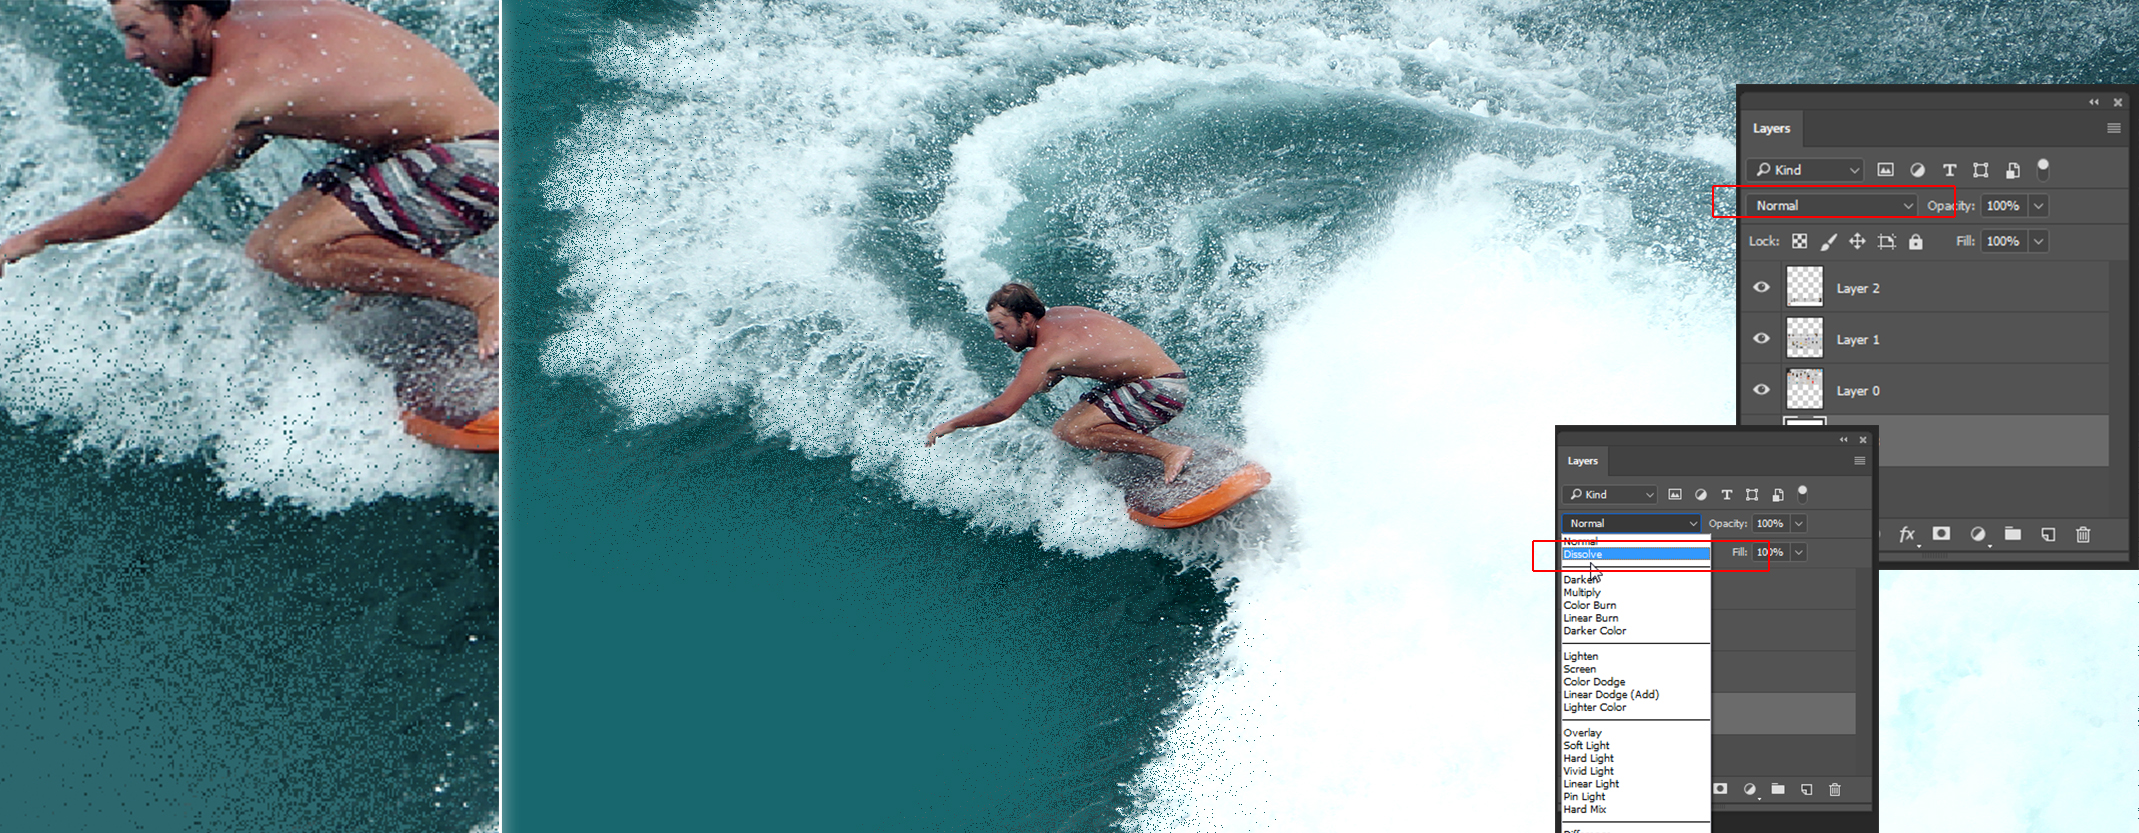
Avoiding Issues with Transparent Gradients
For color transitions at the edges, use tools like "speckle" or "dither" in your graphics program to prevent the white base layer from showing on dark products. -
Color Differences Between Screen and Print
Designs are printed in CMYK mode, while screens display in RGB mode. To minimize color discrepancies, increase the contrast and boldness of your graphic before uploading.
Quick Tips for Success
- Always upload high-resolution graphics (200 dpi minimum).
- Use PNG format for transparency.
- Double-check colors and contrast for optimal print quality.
For more information on preparing your designs, check out our detailed guide on color differences between monitors and printed materials.
-
What are vector designs and how do they work?
Vector graphics are distinct from pixel-based graphics (raster images). Instead of being composed of individual pixels, vector graphics use geometric shapes like points, lines, and curves, which are defined mathematically. This allows them to be resized without any loss of quality, ensuring they remain sharp at any scale.
Why choose vector graphics?
-
Scalability: Resize images as needed without compromising quality.
-
Flexibility: Adjust colors easily after uploading to the Spreadconnect app.
-
Efficiency: Files are smaller because they store only the mathematical definitions of shapes.
Vector graphics are particularly suitable for plot printing, a high-quality method used in flex and flock printing. Plot printing ensures clean and precise designs, making it ideal for T-shirts and other products.

Plot Printing Process
-
Design Preparation: A plotter cuts the design from colored printing foil.
-
Excess Removal: Unnecessary foil is manually removed.
-
Heat Pressing: The design is transferred to the product using heat and pressure.
-
Finalization: The backing film is peeled off, leaving the finished product.
This process works best with vector designs that use simple, geometric shapes and minimal colors.
Requirements for Plot Printing
For your vector designs to print correctly, they must meet the following specifications:
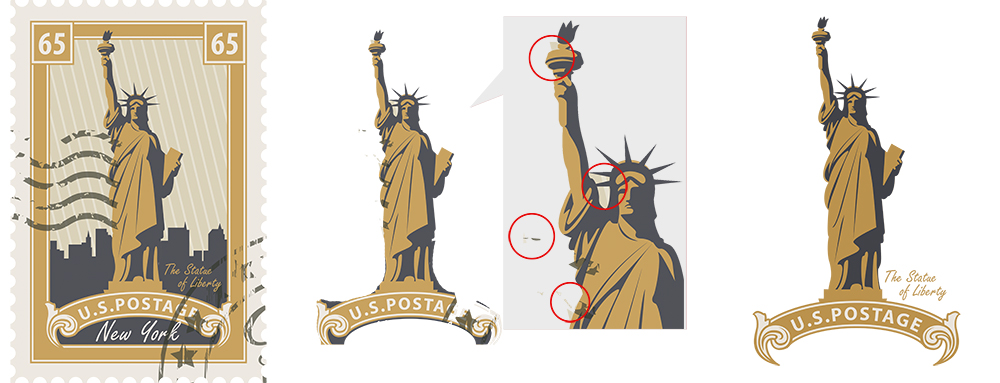
Requirement Details File Types .ai (up to version C18) or .svg (no CSS styles). Design Size Minimum: 10x10 cm. Maximum: 38x38 cm. Line Thickness Minimum diameter: 1.5 mm. Colors Maximum of 3 colors, placed on separate layers. No gradients allowed. Curve Closure All curves must be fully closed to avoid errors during cutting. Paths All design elements (including text) must be converted into paths. 
Left: Vector graphic with color gradient - only possible as digital print, not as a flex and flock print.
Right: Vector graphic without color gradient - we print flex and flock.Measuring Line Thickness and Gaps
-
Use a 1.5 mm diameter circle to check the thinnest lines in your design. Ensure the circle fits entirely on the line.
-
Use a 1 mm diameter circle to verify gaps between design elements.
If lines or gaps do not meet these requirements, adjust the design accordingly. Remember, reducing a design’s size later can compromise these measurements.

Creating High-Quality Vector Designs
Closing Curves
Ensure all curves are fully closed. Open curves can result in unintended straight-line connections during the cutting process. Use the "Combine" or "Merge" functions in your design software to close curves.

Converting Objects into Paths
Convert all elements, including text, into paths. For example:
-
In Adobe Illustrator: Go to "Type" and click "Create outlines" (Shift+Command+O on Mac)
-
In Inkscape: Use "Combine" or "Convert" to ensure objects are properly embedded as paths.

Recommended Tools for Vector Design
-
Adobe Illustrator: A professional tool for advanced vector design.
-
Inkscape: A free, open-source alternative that offers robust features for vector creation.
Advantages of Vector Graphics
-
Perfect for Simple Designs: Best for logos, text, and graphics with up to three colors.
-
High Compatibility: Works well with flex, flock, and digital printing methods.
-
Infinite Scaling: Maintain sharpness at any size.
By following these guidelines and leveraging vector graphic tools, you can create stunning designs suitable for Spreadconnect’s printing processes. For further assistance, consult our Integration Setup Page or reach out to our support team.
-
-
How can I print designs on posters?

This guide provides details about the available poster formats, essential design requirements, and tips for achieving the best results. Follow these steps to ensure your posters are sharp, professional, and perfectly printed.
Available Poster Formats
We offer high-quality posters printed on 250 g/m² semi-gloss photo paper. The available sizes are as follows:
Metric Sizes:
- Portrait: 20 x 30cm / 40 x 60cm / 60 x 90cm
- Landscape: 30 x 20cm / 60 x 40cm / 90 x 60cm
- Square: 20 x 20cm / 40 x 40cm / 60 x 60cm
Imperial Sizes (United States):
- Portrait: 8" × 12" / 16" × 24"/ 24" × 36"
- Landscape: 12" × 8" / 24" × 16" / 36" × 24"
- Square: 8" × 8"/ 16" × 16"/ 24" × 24"
Design Requirements
To ensure the best quality for your printed poster, please adhere to the following requirements:
Accepted Formats:
-
Portrait (2:3 or 3:4), Landscape (3:2 or 4:3), and Square (1:1)
Image Specifications:
-
Resolution: Minimum of 200 dpi
-
File Formats: JPG, PNG
-
File Size: Up to 100 MB
-
Maximum Image Size: 100 megapixels
-
Color Profile: RGB or CMYK
Minimum Dimensions (200 dpi):
-
Portrait: 4724 × 7087 px
-
Landscape: 7087 × 4724 px
-
Square: 4724 × 4724 px
Important Design Notes:
-
White Design Elements: Avoid using white design elements on white backgrounds as they will not be visible.
-
Margins and Bleed Allowance: Add a 2 mm margin around your design to avoid clipping. Keep all important text or design elements at least 4 mm from the edge to prevent unintended cropping.
Tips for a Perfect Design
-
Ensure your design is sharp, clear, and detailed.
-
Adjust contrast and brightness optimally to enhance visual appeal.
-
Use only images and designs that you own to avoid copyright or personal rights violations. Avoid depicting someone else’s face or any content that may infringe on rights.
-
Ensure that your designs comply with all legal guidelines for design and content policies to avoid potential issues.
Templates to Download
To make poster printing easy, we provide templates you can use to prepare your design. Each template includes:
-
A layer that shows the correct size.
-
A red-marked margin of 2 mm to indicate which area might be cut off.
You can open the template using Photoshop or any graphics software that supports .psd files. After opening the template, follow the checklist for poster printing provided below to ensure your design is print-ready.
Format Europe North America* Photoshop Illustrator Photoshop Illustrator 

Download
Download
Download
Download
Download
Download
Download
Download
Download
Download
Download
Download
Download
Download
Download
Download*If you are using the US version of the Spreadconnect App, please use the templates marked North America. The sizes are adjusted to meet US standards (inch). Checklist for Poster Printing
Choose and download a suitable template, open it, and drag your design to the file’s workspace. Then follow these steps:
-
Ensure your design is in the "Your Design" folder.
-
Confirm that your design fills the layer completely (the edges should disappear below the red line).
-
Verify that the red border does not cover any important elements.
-
Deactivate the "Tutorial" layer.
-
Deactivate the "Bleed Allowance" layer (no red margin should be visible).
-
Set the color profile to RGB.
-
Once everything is finalized, save your design under "File > Save As" in .png format.
Handling and Packaging of Posters
-
Delivery Options: Express or premium delivery is unavailable for posters.
-
Packaging:
-
Posters sized 8" × 8" (20 cm x 20 cm) and 8" × 12" (20 cm x 30 cm) are dispatched in a sturdy envelope.
-
Larger sizes, such as 16" × 24" (40 cm x 60 cm) and 24" × 36" (60 cm x 90 cm), are rolled and shipped in a durable cardboard tube.
-
-
Who owns the legal rights of the designs I upload?
You maintain the rights to any designs you upload at Spreadconnect. You can always delete these designs if you wish. Please note that if you do choose to delete your designs, existing products will still be available in your store. You will have to delete these products too.
-
Do you print copyrighted designs for me?
Copyright is an important and sensitive topic. This is why you should get familiar with our design guidelines that you can find here: Legal Guidelines for Designs.
If we detect a questionable design, we either reject it or request you to provide a verification that you own the right to get this design printed.